

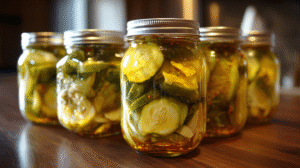
There’s something so deeply satisfying about looking at a pantry shelf lined with jars of food you’ve preserved yourself. It’s like capturing a little bit of summer sunshine to enjoy all winter long, and it makes for the most wonderful homemade gifts.
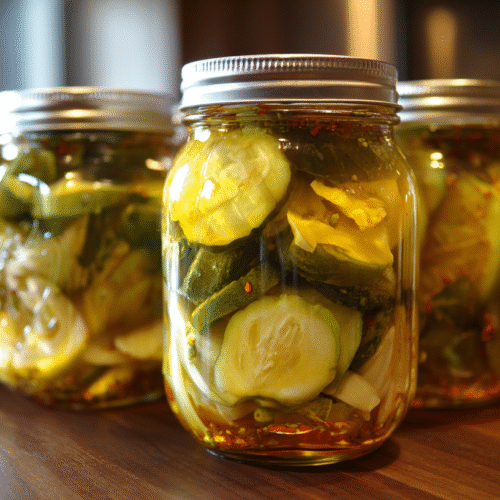
Today, I want to walk you through making one of my absolute favorite preserves: these incredible Sweet and Spicy Pickles. This is a full canning recipe, meaning you’ll have shelf-stable jars that are perfect for gift-giving or stocking your own pantry for the year ahead. They have the perfect sweet, tangy, and spicy flavor that’s amazing on everything from burgers to cheese boards.
If you’re new to canning, don’t be intimidated! I’ll break down every single step to make the process simple, safe, and successful. I’m sharing all my secrets for keeping them wonderfully crisp, even after canning!
A Quick Word on Canning Safety
Canning is a wonderful and safe way to preserve food, but it’s important to follow the steps correctly. The goal is to create an acidic environment and a vacuum seal that prevents the growth of bacteria. This means using clean equipment, tested recipes with the right amount of vinegar, and processing the jars in a boiling water bath for the specified time. Don’t take shortcuts, and you’ll be rewarded with delicious, safe-to-eat pickles! You can Try my Famous Dave’s sweet and spicy pickles.
Ingredients & Equipment
For the Pickles (Makes about 4-5 pint jars):
- 3 lbs Kirby cucumbers or other fresh pickling cucumbers
- 2 medium sweet onions, thinly sliced
- ½ cup pickling salt or non-iodized sea salt
- 3 cups apple cider vinegar (must be 5% acidity)
- 3 cups water
- 3 cups granulated sugar
- 2 tablespoons mustard seeds
- 1 tablespoon celery seeds
- 1 tablespoon red pepper flakes (or more, for extra spice)
- 1 teaspoon ground turmeric
- 8-10 cloves of garlic, peeled and halved
For Canning:
- A large water bath canner with a rack
- 4-5 pint-sized (16 oz) canning jars with new lids and rings
- A jar lifter
- A canning funnel
- A bubble remover tool or a clean chopstick
Active Prep Time: 45 minutes Salting Time: 1-2 hours Processing Time: 10 minutes Cooling/Sealing Time: 12-24 hours

How to Make and Can Sweet and Spicy Pickles
Let’s break it down into manageable steps.
Step 1: Prepare Your Canning Equipment Place the rack in your water bath canner, place your clean jars on top, and fill the canner with enough water to cover the jars by at least an inch. Bring it to a simmer over medium-high heat. You want to keep the jars hot until you’re ready to fill them to prevent them from breaking. Wash your new lids and rings in hot, soapy water.
Step 2: Salt and Rinse the Cucumbers (The Crispness Secret!) Wash your cucumbers well. You can slice them into ¼-inch coins (crinkle-cut or straight) or into spears. In a large, non-reactive bowl, toss the sliced cucumbers and onions with the ½ cup of salt. Cover the bowl with ice and water and let it sit at room temperature for at least 1 hour and up to 2 hours. This step, called purging, is absolutely crucial. The salt draws out excess water from the cucumbers, which is the number one secret to keeping them crisp after canning. After the time is up, drain the cucumbers and rinse them very thoroughly under cold water to remove all the excess salt. Drain them well one last time.
Step 3: Make the Brine While the cucumbers are being rinsed, make the brine. In a large pot, combine the apple cider vinegar, water, sugar, mustard seeds, celery seeds, red pepper flakes, and turmeric. Bring the mixture to a rolling boil over medium-high heat, stirring to ensure the sugar is completely dissolved. Reduce the heat and keep the brine at a low simmer.
Step 4: Pack and Fill the Jars Using your jar lifter, carefully remove one hot jar at a time from your canner, pouring the water back into the pot. Place 2-4 halves of garlic cloves in the bottom of the hot jar. Tightly pack the rinsed cucumber and onion slices into the jar. Using your funnel, carefully ladle the hot brine into the jar, covering the pickles completely but leaving a ½-inch headspace at the top.
Step 5: Seal the Jars Slide your bubble remover tool around the inside of the jar to release any trapped air bubbles. Wipe the rim of the jar with a clean, damp cloth to remove any stickiness. This ensures a proper seal. Place a new lid on top, and screw on the ring until it is “fingertip tight”. Don’t overtighten it. Repeat with the remaining jars.
Step 6: Process in the Water Bath Carefully lower the filled jars into the boiling water in your canner using the jar lifter. Make sure the jars are covered by at least 1-2 inches of water. Place the lid on the canner and bring the water back to a full, rolling boil. Once the water is boiling vigorously, start your timer for 10 minutes (for pints). After 10 minutes, turn off the heat, remove the canner lid, and let the jars sit in the hot water for another 5 minutes. This helps prevent siphoning (liquid loss).
Step 7: Cool, Check, and Store Remove the jars from the canner and place them on a towel-lined countertop. Let them sit, undisturbed, for 12 to 24 hours. You may hear a satisfying “ping!” sound as the jars seal. After they are completely cool, check the seals by pressing on the center of the lid. If it doesn’t flex up or down, the jar is sealed. You can remove the rings for storage if you like. Any jars that did not seal should be placed in the refrigerator and eaten first. Store your sealed jars in a cool, dark place for up to a year. For best flavor, wait at least a week or two before opening a jar.
Ultimate Sweet and Spicy Pickles Recipe
Ingredients
- 3 lbs Kirby cucumbers or other fresh pickling cucumbers
- 2 medium sweet onions thinly sliced
- ½ cup pickling salt or non-iodized sea salt
- 3 cups apple cider vinegar must be 5% acidity
- 3 cups water
- 3 cups granulated sugar
- 2 tablespoons mustard seeds
- 1 tablespoon celery seeds
- 1 tablespoon red pepper flakes or more, for extra spice
- 1 teaspoon ground turmeric
- 8-10 cloves of garlic peeled and halved
Instructions
- Place the rack in your water bath canner, place your clean jars on top, and fill the canner with enough water to cover the jars by at least an inch. Bring it to a simmer over medium-high heat. You want to keep the jars hot until you're ready to fill them to prevent them from breaking. Wash your new lids and rings in hot, soapy water.
- Wash your cucumbers well. You can slice them into ¼-inch coins (crinkle-cut or straight) or into spears. In a large, non-reactive bowl, toss the sliced cucumbers and onions with the ½ cup of salt. Cover the bowl with ice and water and let it sit at room temperature for at least 1 hour and up to 2 hours. This step, called purging, is absolutely crucial. The salt draws out excess water from the cucumbers, which is the number one secret to keeping them crisp after canning. After the time is up, drain the cucumbers and rinse them very thoroughly under cold water to remove all the excess salt. Drain them well one last time.
- While the cucumbers are being rinsed, make the brine. In a large pot, combine the apple cider vinegar, water, sugar, mustard seeds, celery seeds, red pepper flakes, and turmeric. Bring the mixture to a rolling boil over medium-high heat, stirring to ensure the sugar is completely dissolved. Reduce the heat and keep the brine at a low simmer.
- Using your jar lifter, carefully remove one hot jar at a time from your canner, pouring the water back into the pot. Place 2-4 halves of garlic cloves in the bottom of the hot jar. Tightly pack the rinsed cucumber and onion slices into the jar. Using your funnel, carefully ladle the hot brine into the jar, covering the pickles completely but leaving a ½-inch headspace at the top.
- Slide your bubble remover tool around the inside of the jar to release any trapped air bubbles. Wipe the rim of the jar with a clean, damp cloth to remove any stickiness. This ensures a proper seal. Place a new lid on top, and screw on the ring until it is "fingertip tight". Don't overtighten it. Repeat with the remaining jars.
- Carefully lower the filled jars into the boiling water in your canner using the jar lifter. Make sure the jars are covered by at least 1-2 inches of water. Place the lid on the canner and bring the water back to a full, rolling boil. Once the water is boiling vigorously, start your timer for 10 minutes (for pints). After 10 minutes, turn off the heat, remove the canner lid, and let the jars sit in the hot water for another 5 minutes. This helps prevent siphoning (liquid loss).
- Remove the jars from the canner and place them on a towel-lined countertop. Let them sit, undisturbed, for 12 to 24 hours. You may hear a satisfying "ping!" sound as the jars seal. After they are completely cool, check the seals by pressing on the center of the lid. If it doesn't flex up or down, the jar is sealed. You can remove the rings for storage if you like. Any jars that did not seal should be placed in the refrigerator and eaten first. Store your sealed jars in a cool, dark place for up to a year. For best flavor, wait at least a week or two before opening a jar.
Notes
Frequently Asked Questions
1. Can I skip the water bath processing? No. For a shelf-stable pickle, the boiling water bath is essential for killing any potential spoilage organisms and ensuring a strong, safe seal. If you want to skip this step, you can simply make the recipe and store the jars in the refrigerator for up to a month (they would then be refrigerator pickles).
2. Why are my canned pickles soft? This is the most common issue! The likely culprits are: skipping the initial salting step, using old or non-pickling cucumbers, or processing them for too long in the water bath.
3. Can I reduce the amount of sugar? You can reduce it slightly, but keep in mind that sugar is not just for flavor; it also acts as a preservative and helps with the texture. Drastically reducing it can affect the final product’s quality and safety. Do not reduce the amount of vinegar.
Enjoy the process! There is nothing quite like opening a jar of your own homemade pickles in the middle of winter. Happy canning!