
If you’ve ever found yourself craving that irresistible gravy from Dairy Queen to accompany your homemade meals, you’re in luck!
With just a handful of simple ingredients and a few minutes of your time, you can whip up a batch of creamy, savory gravy that rivals the flavor of the beloved fast-food chain’s version.
Let’s dive into the details of this delectable Dairy Queen gravy recipe.
Why You Will Love this Dairy Queen Gravy?
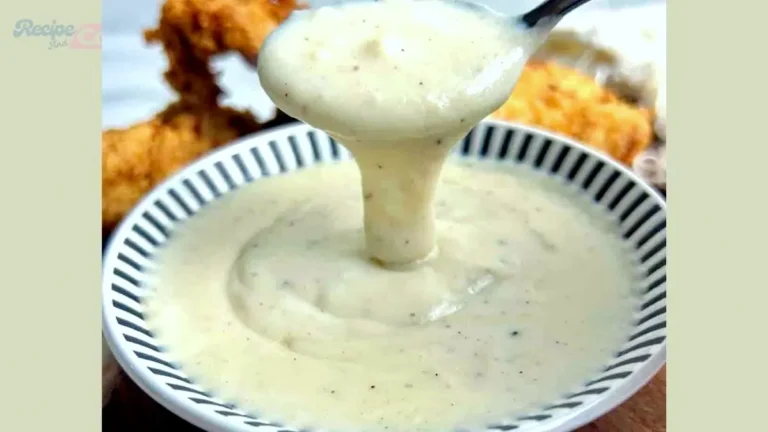
Homemade Dairy Queen gravy, a savory delight that elevates any meal to new heights. With just a few simple ingredients and minimal preparation, you can recreate the irresistible flavor of Dairy Queen’s signature gravy in the comfort of your own kitchen.
Melt butter to perfection, whisk in flour, and slowly incorporate milk until smooth and creamy. Season with a hint of kosher salt and ground black pepper for that perfect balance of flavors.
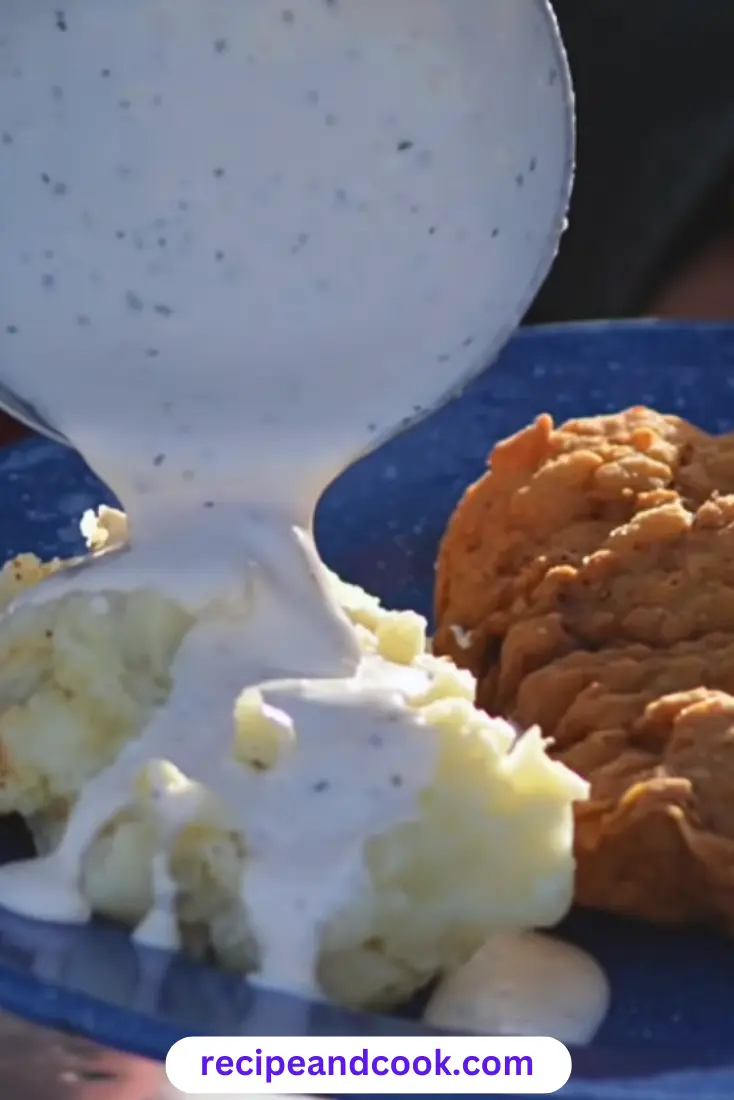
Serve this velvety gravy alongside your favorite dishes, whether it’s crispy chicken strips or fluffy biscuits. For dessert, try it drizzled over warm Dairy Queen Hot Fudge for a decadent twist.
Ingredients in this Dairy Queen Gravy Recipe
- ¼ cup butter (or bacon grease)
- ¼ cup all-purpose flour
- 2 cups milk
- ½ teaspoon coarse kosher salt
- ½ teaspoon ground black pepper
Tools Required
- Skillet
- Whisk or spoon
How to Make Dairy Queen Gravy
Step-01: In a skillet over medium heat, melt the butter. Add the all-purpose flour to the skillet, stirring constantly for 2-3 minutes, until the flour incorporates with the butter and begins to turn a light golden color.

Step-02: Once the roux has reached a light golden color slowly incorporate the milk. Gradually pour the milk into the skillet while whisking continuously to ensure a smooth and creamy texture.
Step-03: Add the coarse kosher salt and ground black pepper, stirring gently and allow the gravy to simmer for an additional minute.

Step-04: Taste the gravy and adjust the seasoning according to your preference. You can add extra salt or pepper to suit your taste buds, ensuring that the gravy is perfectly seasoned.

Serve and Enjoy!!
Some Tasty Ways To Customize Dairy Queen Gravy
1. Chicken Fried Steak: Serve the gravy over crispy chicken fried steak for a classic Southern comfort food dish.
2. Biscuits and Gravy: Pour the gravy over warm, flaky biscuits for a hearty breakfast or brunch option.
3. Mashed Potatoes: Spoon the gravy over creamy mashed potatoes for a satisfying side dish.
4. Roast Chicken: Drizzle the gravy over roast chicken for an extra boost of flavor.
5. Meatloaf: Serve slices of meatloaf smothered in gravy for a comforting dinner.
6. Fried Chicken: Dip fried chicken pieces into the gravy for a delicious twist on a classic favorite.
7. Sausage Patties: Top sausage patties with gravy for a hearty breakfast or breakfast-for-dinner option.
8. Poutine: Use the gravy to make a classic Canadian dish by pouring it over french fries and cheese curds.
9. Baked Potatoes: Spoon the gravy over baked potatoes for a simple yet satisfying meal.
10. Vegetable Casserole: Add extra flavor to a vegetable casserole by mixing in some of the gravy before baking.
Some tips on Dairy Queen Gravy Recipe
1. Use Fresh Ingredients: Opt for fresh butter and milk to ensure the best flavor and texture in your gravy.
2. Properly Measure Ingredients: Accurate measurement of butter, flour, and milk is crucial for achieving the right consistency in your gravy.
3. Adjust Consistency: If your gravy is too thick, you can add more milk to thin it out. Conversely, if it’s too thin, you can simmer it for a bit longer to thicken it up.
4. Whisk Constantly: Stirring or whisking the roux and milk mixture continuously helps prevent lumps from forming and ensures a smooth gravy consistency.
5. Control the Heat: Maintain medium heat throughout the cooking process to prevent the gravy from burning or boiling over.
6. Season to Taste: Taste the gravy before serving and adjust the seasoning according to your preference. You can add more salt and pepper if needed.
7. Experiment with Flavors: Feel free to add herbs, spices, or other seasonings to customize the flavor of your gravy to suit your taste preferences.
8. Use a Non-Stick Skillet: Using a non-stick skillet can make cleanup easier and prevent the gravy from sticking to the bottom of the pan.
9. Reheat Gently: If reheating leftover gravy, do so gently over low heat on the stovetop to prevent it from becoming too thick or grainy.
10. Serve Immediately: Gravy is best served hot and fresh. Try to serve it immediately after preparing for the best flavor and texture.
How To Store This Food
If you happen to have any leftovers (which is unlikely!), you can store the gravy in an airtight container in the refrigerator for up to 4 days.
Simply reheat the gravy gently on the stovetop or in the microwave before serving.
FAQs on This Dairy Queen Gravy Recipe
Here are some commonly asked questions and their short answers on this Dairy Queen Gravy Recipe
1. Can I use margarine instead of butter?
While butter is the traditional choice for making gravy, you can use margarine as a substitute if desired. However, keep in mind that the flavor and texture may vary slightly.
2. Can I use a different type of flour?
All-purpose flour is recommended for this recipe, but you can experiment with alternative flours such as whole wheat flour or gluten-free flour blends. Just be aware that it may affect the texture and flavor of the gravy.
3. Can I use plant-based milk instead of dairy milk?
Yes, you can use plant-based milk such as almond milk, soy milk, or oat milk as a dairy-free alternative. However, keep in mind that it may alter the flavor and consistency of the gravy slightly.
4. How do I prevent lumps from forming in the gravy?
Whisking the flour and butter mixture continuously while gradually adding the milk helps prevent lumps from forming. If lumps do appear, you can strain the gravy through a fine-mesh sieve to remove them.
5. Can I make this gravy ahead of time?
Yes, you can make the gravy ahead of time and store it in an airtight container in the refrigerator for up to 4 days. Reheat gently on the stovetop or in the microwave before serving.
6. What dishes can I serve this gravy with?
This gravy pairs well with a variety of dishes, including chicken fried steak, biscuits, mashed potatoes, roast chicken, meatloaf, fried chicken, sausage patties, poutine, baked potatoes, and vegetable casseroles.
7. How can I make the gravy thicker or thinner?
To make the gravy thicker, simmer it for a longer period of time to reduce and thicken. To make it thinner, simply add more milk until you reach the desired consistency.
8. Can I freeze this gravy?
While you can freeze gravy, the texture may change slightly upon thawing. It’s best to consume the gravy fresh or refrigerate any leftovers for up to 4 days.
9. Can I add additional seasonings to the gravy?
Yes, feel free to customize the flavor of the gravy by adding herbs, spices, or other seasonings to suit your taste preferences.
10. Is this gravy suitable for vegetarians?
Yes, this gravy is suitable for vegetarians as it does not contain any meat-based ingredients. It’s a delicious option for vegetarians to enjoy with their favorite dishes.
Feel free to share your experience with this recipe by trying it out. Don’t forget to drop a comment and provide your feedback on the blog for us to read.
Additionally, You can also like and, follow us on Pinterest, and Reddit for more updates. Your thoughts and engagement are greatly appreciated!
1 comment