
Hey there, fellow dessert enthusiasts! Today, I’m here to whisk you away on a delicious journey into the world of homemade ice cream-specifically, KitchenAid Chocolate Ice Cream Recipe. Picture this: velvety, rich chocolate swirled with creamy goodness, all made right in the comfort of your own kitchen.
Sounds like a dream, doesn’t it? Well, get ready to turn that dream into a reality because I’ve got the scoop (pun totally intended!) on the perfect recipe to satisfy your sweet cravings. Whether you’re a seasoned pro or a newbie in the kitchen, this recipe is about to become your new favorite go-to for indulgent treats.
So, grab your KitchenAid mixer and let’s dive headfirst into the delectable world of homemade chocolate ice cream!
More KitchenAid Recipes:
How to Make kitchenAid Chocolate Ice Cream Recipe
Making chocolate ice cream is a simple process of preparing an ice cream base, chilling it thoroughly, and then churning and freezing. Here are more details on each step:
Ingredients
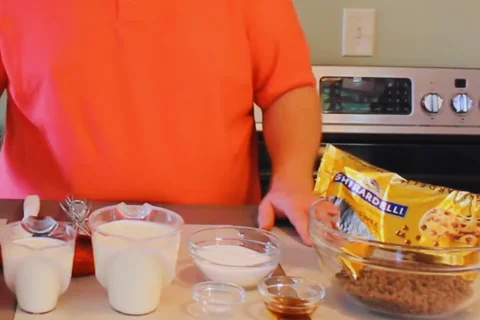
- 1 cup Whole Milk
- 2 cups Heavy Cream
- ¾ cup Granulated Sugar
- 1 large Pinch of Salt
- 2 tsp Vanilla Extract (homemade, if possible)
- 1 (12 oz.) Bag of Chocolate Chips
Kitchen Appliances Needed:
- KitchenAid Stand Mixer
- Ice Cream Bowl Attachment
- Pot
- Freezer-Safe Container
Step-by-Step Instructions
Preparation:
1. Ensure your ice cream bowl has been in the freezer for at least 15 hours, set at the lowest temperature, and placed in the deepest part of the freezer.
Base Mixture:
1. In a pot, combine milk, heavy cream, sugar, and salt.
2. Heat the mixture until it reaches 200 – 205°F or when you see the first bubble. *Do not boil.*
3. Pour the hot mixture over chocolate chips, letting it sit for 1 – 2 minutes. For bar chocolate, cut it into small pieces before adding.
4. Add vanilla extract.
5. Stir until all the chocolate is dissolved.
Cooling the Base:
1. Cool the base to 40°F or below. If using the refrigerator, cover the base with plastic wrap. You can speed up the process with an ice bath.
Ice Bath Instructions (if needed):
Warning: Do not put a hot glass bowl into an ice bath!
1. Transfer the hot mixture to a plastic or metal bowl.
2. Combine ice, salt, and water in a larger bowl, enough for the smaller bowl to float on top.
3. Place the ice cream base bowl into the ice bath.
4. Stir the ice cream base every few minutes to expedite cooling. Refrigerate if necessary.
Churning the Ice Cream:
1. Set up the ice cream maker. For KitchenAid, use the Stir (Lowest) setting.
2. Depending on your machine’s instructions, slowly pour in the ice cream base.
3. Churn for approximately 25 – 28 minutes or per your machine’s recommendation.
Freezing and Enjoying:
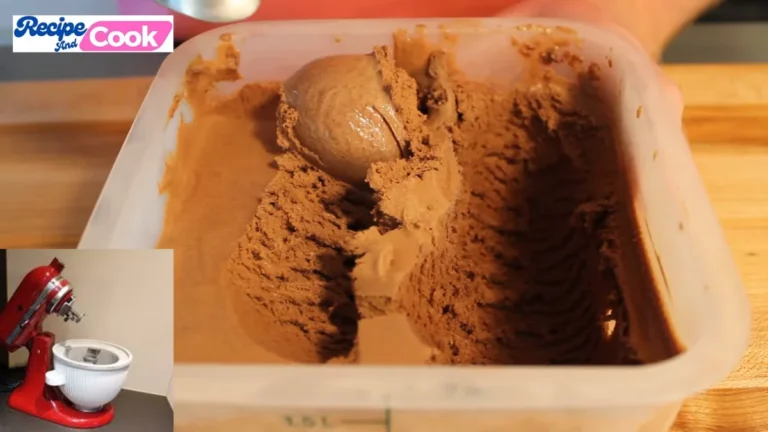
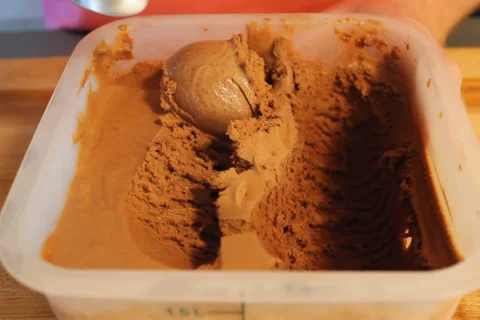
1. Transfer churned ice cream into a freezer-safe container.
2. Freeze for 4 – 6 hours; however, it can be enjoyed sooner for a softer texture.
3. Enjoy your delightful homemade chocolate ice cream!
Tips for Making the Best Homemade Chocolate Ice Cream
- Use high quality chocolate like Guittard or Ghirardelli chips for maximum flavor.
- Try substituting 2 tablespoons of instant espresso powder for 2 tablespoons of the sugar to add depth.
- For ultra creamy ice cream, use half and half instead of heavy cream.
- Add a teaspoon of vanilla paste instead of extract for more prominent vanilla flavor.
- For fudgy chocolate swirls, melt 3 oz. chocolate and drizzle through base once churned.
- Let ice cream sit at room temperature 5-10 minutes before scooping for ideal texture.
Recommended KitchenAid Models and Attachments
Nearly all KitchenAid stand mixers can handle ice cream making with the proper attachments:
- Ice Cream Maker Attachment – This plastic bowl attaches to the power hub and churns the base. It must be frozen for 24 hours before each use.
- Food Grinder Attachment – Great for crushing cookies or candy to mix in. Grind nuts into homemade nut butter.
- Flex Edge Beater – The flexible sides help fold mix-ins throughout the base.
Popular mixer models like the Pro 5 Plus, Artisan, and Professional 600 series all work fantastically for homemade ice cream. The heavy duty motors provide power to churn even thick bases.
Substitutions and Variations
One of the joys of making your own ice cream is experimenting with flavors. Try these delicious variations on chocolate ice cream using your KitchenAid mixer:
- Cookies and Cream – Use Oreo cookies instead of chocolate chips and add crushed cookies as a mix-in.
- Mexican Chocolate – Add 2 tsp ground cinnamon and 1/4 tsp cayenne pepper to the base.
- Chocolate Peanut Butter – Swirl in 1/2 cup peanut butter before freezing.
- Chocolate Mint – Add 1 tsp peppermint extract and swirl in chocolate fudge sauce before freezing.
- Mocha – Replace 1/2 cup sugar with instant espresso powder.
Storing Suggestions
Store churned chocolate ice cream in an airtight container in the freezer. Press plastic wrap directly on the surface before sealing to prevent ice crystals. Properly stored ice cream will keep for 1-2 weeks.
For longer storage, consider these tips:
- Store ice cream in individual serving containers, leaving 1/2 inch headspace to allow for expansion during freezing.
- Double wrap containers with plastic wrap or foil for extra insulation.
- Freeze for up to 2 months.
- Allow ice cream to thaw slightly at room temperature before serving for best texture after prolonged freezing.
Frequently Asked Questions
What if I don’t have a KitchenAid ice cream attachment?
You can make this recipe in any ice cream maker. Chill the base completely before freezing according to your machine’s instructions.
Can I make ice cream without an ice cream machine?
Yes, you can make no churn ice cream. Increase the heavy cream to 3 cups and use a gallon sized freezer bag. Freeze 2-3 hours, massaging every 30 minutes.
Why does homemade ice cream have a different texture than store bought?
Less air is whipped into homemade ice cream, giving it a dense, ultra creamy texture. Commercial ice creams often contain gums and stabilizers for an airier, fluffier texture.
How long does homemade ice cream last in the freezer?
Properly stored in a sealed container, ice cream will retain optimal quality about 1-2 months. After that, you may notice ice crystals and a change in texture.
What should I do if ice cream becomes too hard in the freezer?
Let ice cream sit at room temperature 10-15 minutes to soften before scooping. You can also microwave 5-10 seconds to slightly soften hardened ice cream.
Final Words
Homemade KitchenAid Chocolate Ice Cream Recipe is truly a treat you and your loved ones will be proud of. The unbeatable flavor of real dairy, cream, chocolate and vanilla beans takes this classic to new heights. With the power of a KitchenAid stand mixer, you can easily churn batch after batch of customized, ultra creamy chocolate perfection.
Get creative with mix-ins and serve for any occasion. Made with love (and chocolate), what could be better?
2 comments